
Accurate geochemical analysis begins long before a sample reaches the laboratory instruments. Sample preparation is a critical process that ensures samples are representative, homogeneous, and suitable for analysis. Careful preparation helps produce reliable results while minimizing contamination, variability, and analytical bias.
Each sample preparation stage, from drying and crushing to pulverizing and sieving, plays an important role in producing a representative analytical sample. In this article, we explore the main stages of geochemical sample preparation, the quality control measures used throughout the process, and some of the factors that can affect sample representativity and analytical accuracy.
Working with geological samples involves dust, heavy materials, and powerful equipment. To protect employees, appropriate personal protective equipment (PPE) is used throughout the preparation process, including protective clothing, safety footwear, gloves, respiratory protection, and hearing protection when required.
Dust control is equally important. Dust-generating equipment is connected to a centralized extraction system that filters airborne particles and helps maintain a safe working environment. Special procedures are also followed when handling samples containing materials such as naturally occurring radioactive material (NORM), heavy metals, or asbestos.
Good ergonomics play an important role in daily operations. Adjustable workstations and automated equipment help reduce manual handling and improve workplace safety.
The sample preparation process begins before the samples arrive at the laboratory. Customers provide an electronic sample submission form together with a sample list, and transportation can be arranged either by the customer or the laboratory.
Upon arrival, packages are inspected for damage and radioactivity measurements are performed. Once registered into the laboratory system, the samples are ready for preparation.
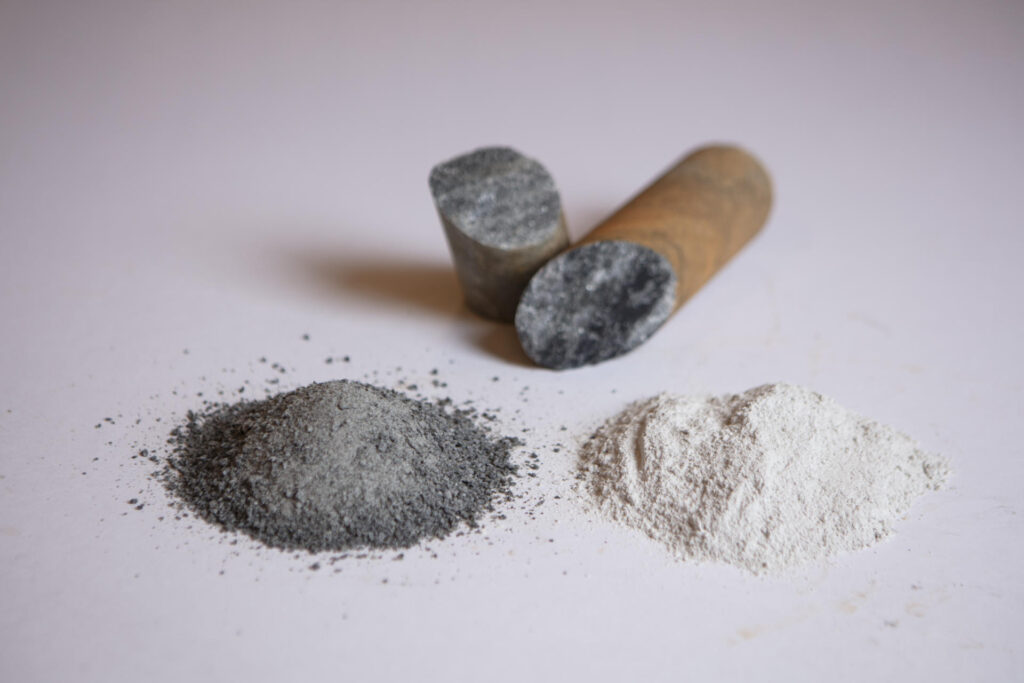
Before analysis, samples undergo a series of preparation steps designed to produce a representative and homogeneous analytical sample. The exact workflow may vary depending on the sample type and analytical requirements, but the most common preparation methods include drying, crushing, splitting, pulverizing, and sieving.
| Method | Purpose | Typical Practice |
| Drying | To remove moisture from the sample to ensure consistent weight, homogenous sample and the efficiency of crushing and splitting | Samples are dried in ovens in bags or metal trays, often in large batches using oven trolleys. Drying temperatures are typically below 105 °C, while samples containing volatile elements may require temperatures below 60 °C. Samples are weighed after drying. |
| Crushing | To reduce large pieces of core, rock or till to smaller fragments | Samples are crushed using mild or hardened steel jaw crushers to approximately 70–80% passing 2 mm. Equipment is cleaned between samples to minimize contamination, and crushing performance is regularly monitored using sieve tests. |
| Splitting | To obtain a representative subsample from the crushed material for pulverizing and analysis | Samples are split using riffle or rotary splitters, either integrated with the crusher or operated separately. Split sizes are selected according to analytical requirements and commonly range from 250 g to 900 g. |
| Pulverizing | To homogenize the sample and reduce particle size to a fine powder for analysis | A split subsample or the entire sample is pulverized using manual or automatic ring-and-puck mills with steel, agate, or tungsten carbide bowls. Grinding bowls are cleaned between samples to prevent cross-contamination. The typical target is 85–90% passing 75 µm (200 mesh), verified through routine sieve testing. |
| Sieving | To select specific-size fractions for analysis; important for sediment and till samples where geochemical signatures are often carried in fine-grained material | Samples are sieved to obtain a defined size fraction, most commonly <63 µm. Depending on the analytical program, coarser fractions such as <180 µm or <250 µm may also be used. |
Laboratories routinely use internal blank samples, duplicate samples, and sieve tests throughout the workflow to monitor preparation performance and ensure consistent results.
Blank samples help detect potential contamination between samples, while preparation duplicates are used to assess the reproducibility of crushing, splitting, and pulverizing procedures. In addition, regular sieve tests verify that target particle size specifications are consistently achieved.
Not all geological materials behave the same way during preparation.
One common challenge is the nugget effect, where valuable minerals such as gold occur as coarse particles that are unevenly distributed throughout the sample. This can reduce result reproducibility if subsamples are too small. Using larger sample masses and representative splitting helps minimize this effect.
Differences in mineral hardness can also influence preparation quality. Soft minerals may overgrind while harder minerals remain coarse, resulting in uneven particle size distributions. Optimized grinding conditions help ensure a homogeneous analytical sample.
Certain sulfide-rich materials may also be highly reactive. During drying or grinding, these samples can generate heat and require special handling procedures to ensure safe processing.
Whether you require routine sample preparation or support for more complex projects, understanding the preparation process is the first step toward obtaining accurate and dependable analytical results. Contact our team to learn more about our sample preparation services and how we can support your project.
Did you miss our webinar on sample preparation? We’re happy to send the recording to you on request!